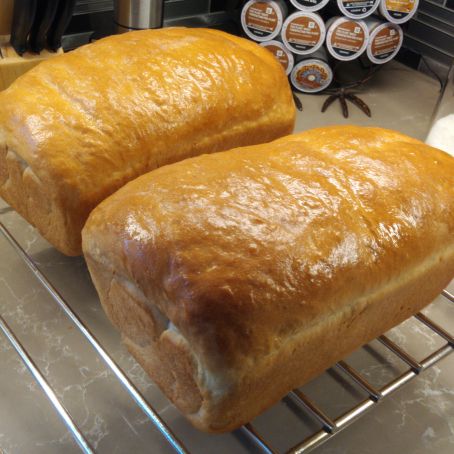
There is nothing like the aroma of homemade bread baking in your house. This bread makes great toast, and can also serve as a quick breakfast for the kids to grab on their way to school.
INGREDIENTS
- 1/2 cup milk
- 3 tablespoons sugar
- 2 teaspoons salt
- 3 tablespoons butter
- 2 packages active dry yeast, OR 4.5 teaspoons bulk active dry yeast
- 1 1/2 cups warm water (105°F to 115°F)
- 5 to 6 cups all-purpose flour
PREPARATION
STEP 1
The water (and heated milk mixture) should be lukewarm when added so it doesn’t kill the yeast. A digital thermometer is your best friend at this stage, although not absolutely required. Since the liquids should be just above body temperature, they should feel just barely warm. I’ve been baking bread for decades, and I don’t feel I really took control of the process until I started using a thermometer.
I prefer unbleached all-purpose flour – usually King Arthur or Gold Medal – but use your favorite variety. Just make sure it is not self-rising.
Combine the milk, sugar, salt, and butter in either a small saucepan or medium size microwaveable container. I use my 4-cup Pyrex measuring cup in the microwave.
If using the stove top, heat over low heat until the butter melts and the salt and sugar dissolve.
If using the microwave, heat on high for about 60 to 90 seconds. The butter will not be completely melted but there will be enough residual heat to complete the job while the liquid cools. Stir to finish dissolving the salt and sugar.
Cool to lukewarm (about 105°F to 115°F).
Warm the mixing bowl with a cup or two of hot tap water. Swirl it around a bit and then dump out. Dissolve the yeast in the 1 1/2 cups of warm water in the warmed bowl, whisking a bit with a fork or small whisk to help it along.
Add the lukewarm milk mixture and 4 1/2 cups of the flour. Attach the bowl and the dough hook to the mixer, making sure you lock the head in place. Mix at the lowest speed (the first position the speed lever clicks to) for 2 minutes.
Continue at this speed, adding the rest of the flour, 1/2 cup at a time, until the dough clings to the hook and clears the sides of the bowl. You might need to help it along once or twice by pushing the flour down the sides of the bowl with a rubber spatula, but that’s about it.
Knead at this same speed for another 3 to 5 minutes until the dough is smooth and elastic. It will be slightly sticky to touch.
RISING AND SHAPING LOAVES
Turn into a greased bowl (I use butter; use your preferred option). Turn (spin) the dough slightly to transfer some of the butter then flip over. Cover and let rise in a warm place free of drafts until doubled, about an hour. I use plastic wrap to cover the bowl, but tea towels are also popular. Avoid terry cloth towels as they tend to leave behind bits of lint on the dough.
Punch down the dough and divide in half using a dough cutter or bench scraper. If you want to be really persnickety, you can use a digital kitchen scale to make sure you’ve divided the dough evenly.
Lightly sprinkle your work surface with flour – you should need less than 1/4 cup total. Roll and shape each half into a rectangle about 9″ x 14″. Fold in thirds along the long edge, brushing off any excess flour. Roll tightly starting from a short end. Pinch the bottom seam and the ends, tucking them under and gently shaping into a loaf.
Place each in a greased 8.5″ x 4.5″ x 2.5″ loaf pan with the seam on the bottom. Cover and let rise in a warm spot away from drafts until doubled, about an hour.
Bake at 400°F for 30 minutes until a rich golden brown. Turn out from the pans right away and cool on wire racks. Tip: if you tap the bottom of each loaf it should sound hollow, signaling it is done.
Notes About Ingredients and Equipment:
I buy my yeast in bulk from King Arthur Flour. Try the SAF Red Instant Yeast. One packet of yeast equals 2 1/4″ teaspoons. The best way to store it is in the freezer in an airtight container (they sell appropriate containers at King Arthur). It’s good for several years if you don’t use it up before then. But if your bread isn’t rising very well and the yeast is more than 2 years old, get a new sup