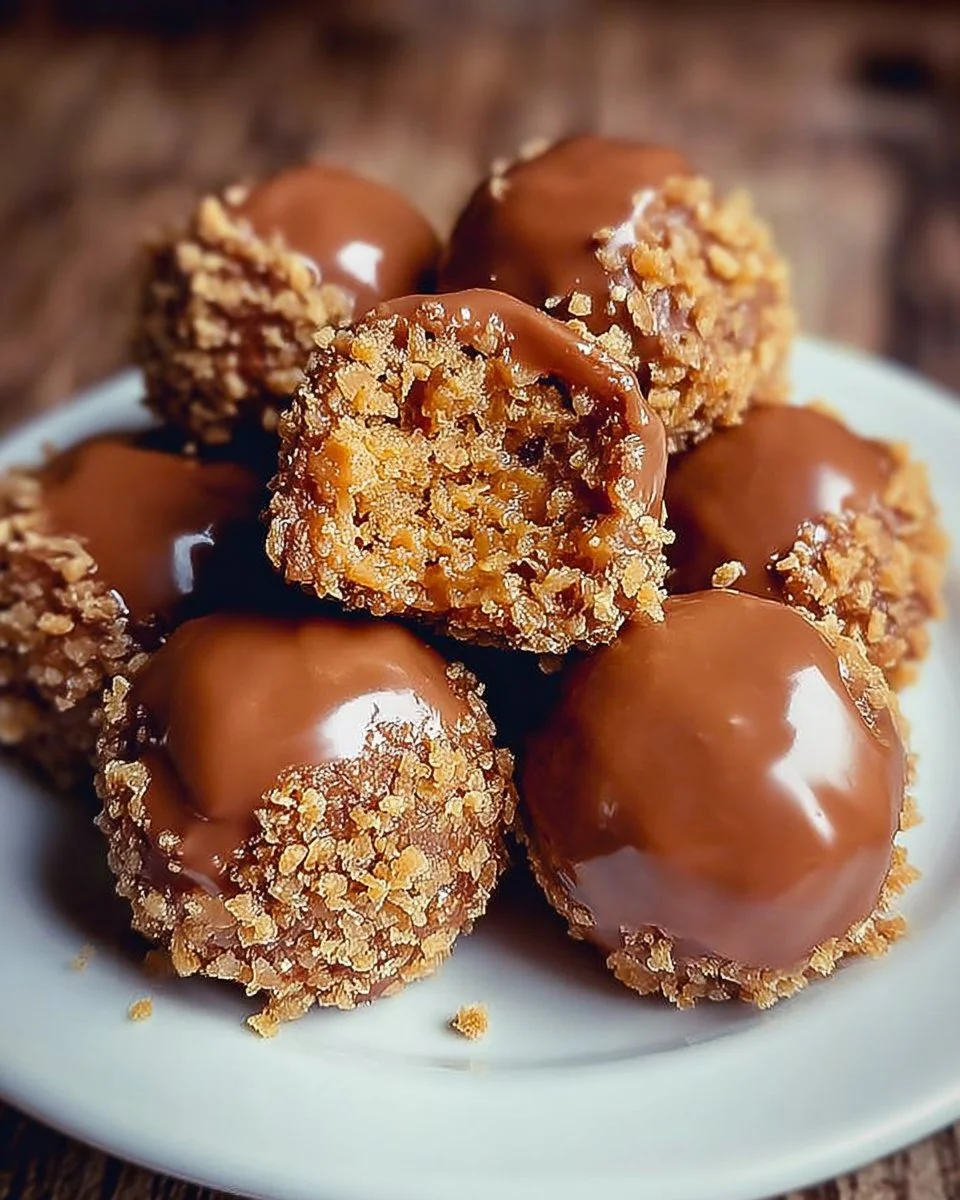
Butterfinger Balls: The Sweet Bite-Sized Treat That Feels Like Home
The first time I made Butterfinger Balls, I was a homesick college kid missing my mom’s kitchen and all its warm, peanut-buttery magic. There’s just something about these little treats that takes me straight back: the afternoons spent sneaking bites of dough, the anticipation as they chilled in the fridge, the sweet, nutty aroma drifting through the house with every batch. If you’re looking for an easy, no-bake dessert with that nostalgic, homemade touch, Butterfinger Balls are your answer. Trust me—you’ll want to eat them straight from the tray (and probably will).
Why You’ll Adore This Butterfinger Balls Recipe
Let me tell you, there’s a good reason these Butterfinger Balls have become a family favorite:
- Effortless to make. You don’t need any fancy equipment or special skills—just a bowl, a spoon, and a love for peanut butter.
- Seriously satisfying. The combo of creamy peanut butter, rich butter, and a vanilla hint is downright crave-worthy. (You can totally taste the love.)
- Customizable. Dip them in chocolate for that true Butterfinger vibe, or keep them simple for an everyday sweet treat.
- Perfect for sharing. There’s something joyful about offering a homemade goodie to a friend, neighbor, or any guest who pops by. These bite-sized treats always bring smiles!
Ingredients You’ll Need for Butterfinger Balls
Here’s what you’ll want to gather before diving in:
- 1 cup peanut butter (Creamy or chunky, both work! I like a classic creamy peanut butter for best texture, but you do you.)
- 1/2 cup butter, softened (Room temperature makes it easier to mix—bonus if it’s real butter for that delicious, rich flavor.)
- 1 teaspoon vanilla extract (Pure vanilla gives the best, most aromatic results.)
- 1 cup powdered sugar (This sweetens things up and binds the mixture beautifully.)
- Optional: melted chocolate for dipping (Go semi-sweet or milk chocolate for that classic “candy bar” twist.)
Tip: Using high-quality peanut butter and fresh butter really makes the flavor pop!
Step-by-Step Guide: Making the Perfect Butterfinger Balls
Here’s how I do it (and how you absolutely can, too):
- Mix your base. In a mixing bowl, blend together the peanut butter, softened butter, and vanilla extract until smooth and fully combined. (I love using a wooden spoon or hand mixer for this—it comes together easily.)
- Sweeten and bind. Gradually add in the powdered sugar. Mix until everything is well-blended and you have a soft dough—don’t worry if it’s a little sticky.
- Shape the balls. Scoop out small spoonfuls (about 1 tablespoon each) and roll them into balls with your hands. Place them on a parchment-lined baking sheet. (This part is extra fun with kids or helpers!)
- Chill out. Pop the tray in the refrigerator for at least 1 hour. This helps the Butterfinger Balls firm up and keep their shape.
- Indulge (optional). If you’re feeling extra, dip the chilled balls in melted chocolate. Let them set on the tray or a cooling rack until the chocolate hardens. (Once you try them this way, you’ll know why I almost always go for the chocolate dip.)
My Secret Tips and Tricks for Butterfinger Balls Success
Over the years, I’ve picked up a few helpful tips for making irresistible Butterfinger Balls (and, yes, sneaking a few while you work is totally acceptable):
- Use parchment paper or a silicone mat for easy clean-up and perfectly shaped balls (less sticking!).
- Chill your dough before rolling if it’s too sticky—sometimes a quick 10 minutes in the fridge does wonders.
- Get creative with coatings: crushed pretzels, chopped nuts, or even a drizzle of white chocolate all add extra flair and flavor.
- Store in an airtight container (keeps them fresher, longer—and away from sticky fingers!).
The better the butter, peanut butter, and vanilla, the more “wow” factor in every bite! No need for complicated baking techniques—just pure, simple goodness.
Creative Variations and Ingredient Swaps
Butterfinger Balls are basically a blank canvas begging for your personal touch:
- Dairy-free? Swap in plant-based buttery spread (vegan butter) if you need a dairy-free version—still delicious!
- Gluten-free? Stick with traditional ingredients (which are already gluten-free) or roll in gluten-free sprinkles/coconut for some crunch.
- Extra crunch? Add ¼ cup of crushed cornflakes or crispy rice cereal into the dough for a true “Butterfinger” texture (so good).
- Nut-free homes? Almond or sunflower seed butter works just as well—the flavor is different but just as lovely.
- Seasonal spins: Stir in a pinch of cinnamon around the holidays or roll finished balls in festive sprinkles for a party table hit.
It’s hard to mess these up—just have fun and make them your own.
How to Serve and Store Your Butterfinger Balls
I love piling these Butterfinger Balls onto a pretty plate for parties or keeping a stash in the fridge for lunchbox treats and afternoon pick-me-ups.
- Serving: Let them stand at room temperature for about 10 minutes before serving for the best texture (especially if dipped in chocolate!).
- Storing: Keep Butterfinger Balls in an airtight container in the fridge—they’ll stay fresh for up to a week. You can also freeze them for longer storage (perfect for prepping ahead or unexpected guests).
- Freezing: Layer the balls with parchment or wax paper in a freezer-safe bag or container.
Honestly, they’re just as good cold as they are at room temp (maybe even better in the summertime!).
FAQs: Your Top Questions About Butterfinger Balls Answered
Q: Can I use natural peanut butter in Butterfinger Balls?
A: Absolutely, but keep in mind—natural peanut butter can be oilier and less stable. Stir it well and consider chilling your dough a little longer to help the balls keep their shape.
Q: Are Butterfinger Balls gluten free?
A: Yes! As long as all your ingredients (especially add-ins like sprinkles or cereals) are gluten free, this dessert is perfect for gluten free diets.
Q: How do I keep Butterfinger Balls from sticking to my hands?
A: Slightly dampen your hands with cold water before rolling or chill the dough before shaping. (It really helps with sticky mixtures!)
Q: Can I double or halve the recipe?
A: Yes—this recipe is super flexible. Make a small batch or enough for a crowd. Just adjust the chill time a bit as needed.
Q: What chocolate is best for dipping Butterfinger Balls?
A: I love semi-sweet or even milk chocolate chips (just melt with a bit of coconut oil for a smoother dip). White chocolate is also gorgeous for a pretty contrast!
Butterfinger Balls may be simple, but they’re packed with comfort, joy, and everything I crave in a homemade sweet treat. I hope you’ll make them, share them, and create your own memories—one irresistible bite at a time. If you try them, let me know what you think or how you’ve made them your own. Happy snacking!