Ingredients
, homemade single pie crust 1 sheet of pie dough
For the apple filling
- 1/4 teaspoon lemon zest
- juice from half a lemon, 2 tablespoons, no more
- 5 pounds apples, 5 pounds before peeling and coring
- 1/2 cup brown sugar, packed
- 1/2 cup granulated sugar
- 1/3 cup all-purpose flour
- 1/2 teaspoon kosher salt
- 1 & 1/2 teaspoons cinnamon
- 3/4 teaspoon nutmeg
- 1/2 teaspoon cardamom, optional
- 1 teaspoon vanilla
For the sugar crumble
- 1 & 1/2 cups all purpose flour
- 1/3 cup granulated sugar
- 3/4 cup brown sugar, packed
- 1/2 teaspoon kosher salt, use a little less if using table salt
- 3/4 cup butter, melted (1 and 1/2 sticks)
Instructions
- Choose your apples.You need 5 pounds of apples for this recipe, which is about 11 large apples. I like to use a mix of apples for the best flavor. For this pie I used Granny Smith, Honeycrisp, and Golden Delicious.
- Make the filling:Use a microplane grater to zest 1/4 teaspoon lemon peel into a 12-inch high sided skillet . The heat should be off.
- Add the juice from half the lemon to the skillet, about 2 tablespoons. Don’t use much more than this, you’re not making a lemon apple pie. We just want to wake up the apples a bit and keep them from browning.
- Use a potato peeler or this handy apele peeler to peel the apples. Slice the apples into 1/8 inch pieces. Check out the photos above to see my method for slicing apples. I like to peel and slice one apple at a time so that they don’t get brown: I peel one apple, then stop and slice it, add it to the pan with the lemon juice, and then move on to peeling the next apple. Stir the apples in the pan occasionally to coat everything with lemon juice.
- Once you have all the apples peeled and sliced in the pan, set it over medium heat on the stove.
- Add 1/2 cup packed brown sugar, 1/2 cup granulated sugar, 1/3 cup flour, 1/2 teaspoon kosher salt, 1 and 1/2 teaspoons cinnamon, 3/4 teaspoon nutmeg, and 1/2 teaspoon cardamom (optional). Stir it together gently so you don’t break all the apples.
- Once the mixture is all moistened and you don’t see patches of flour or cinnamon, set a timer for 20 minutes. Cover the mixture completely with a lid, but don’t walk away. Stick around and stir the mixture every 3 minutes or so, replacing the lid each time. Cook for 20 minutes, until the apples are fork tender but still hold their shape. The apples will not soften more while baking in the oven. So have a taste and see if you want to cook a longer or shorter time. Only you can know your apple al dente perfection level.
- Remove the pan from heat and stir in 1 teaspoon vanilla.*
- Transfer the apple pie filling (including all the the brown caramel gooeyness) to a half sheet pan, or any pan with a lip. Spread the apples all the way to the edges. Cool the apple pie filling completely by placing it in the fridge or the freezer. If you put it in the freezer, it only takes 30 minutes or so. (If you have plenty of time, you can just leave the apples in the pan to cool down; it will take a couple hours.)
- Roll out your pie duugh and place in a 9-inch pie dish. Fold the edges underneath and crimp them with your fingers and thumbs. See my pie crust recipe for lots of photos and details.
- Place the pie crust in the fridge or freezer for about 30 minutes, for a really flaky crust.
- While the crust and filling are chilling, place a baking sheet or pizza stone in the center rack of your oven and preheat to 425 degrees F. Let it heat up for at least 20-30 minutes to make sure it’s really hot.
- Make the sugar crumble:In a medium bowl, add the dry ingredients for the crumble: 1 and 1/2 cups flour, 1/3 cup white sugar, 3/4 cup packed brown sugar, and 1/2 teaspoon kosher salt (use less for table salt). Whisk together.
- In a small bowl, melt 3/4 cup butter (1 and 1/2 sticks). Pour the butter over the dry ingredients and stir together gently. You should end up with a pretty wet sandy mixture with some large clumps. See photos. Let it chill in the fridge until you are ready to assemble. Try not to eat it all.
- When the apple pie filling in the freezer is completely cooled, and the pie shell is mostly frozen, take them out of the freezer. Use a rubber spatula to scrape all the chilled apple pie filling into the pie shell. Don’t forget to scrape in every last bit of the gooey filling.
- Use your hands or a fork to break the crumble into smaller bite size pieces. Top the pie with about a cup or two of the sugar crumble, not all of it! You only want to add enough to cover all the apples, we are not piling it on. (That’s for later.) Place the remaining crumble back in the fridge to chill.
- Bake the pie:Place the chilled pie onto the baking sheet in the oven and let bake for 15 minutes at 425 F. The crust on the edge should be turning light brown.
- Meanwhile, get a square of tin foil that is the same size as your pie. Fold it in half, then in half again. Cut out the center. Open it up again. You should have a square of foil with a circle cut out of the center. See pie crust post for more details.
- After baking at 425 for 15 minutes, reduce the heat to 350 degrees F. Don’t take the pie out of the oven. Just change the temperature.Bake at 350 for an additional 10 minutes.
- At this point, remove the pie from the oven and quickly shut the oven door.Sprinkle the remaining chilled crumble all over the top of the pie. Break up large pieces with your fingers.Place the foil on top of the pie crust (the center of the pie should be exposed). Loosely crimp it around the crust on the edge. This will protect the edges from burning.
- Don’t forget that your oven temperature should be at 350. Place the pie back on the hot baking sheet in the oven and bake at 350 for about 25-35 more minutes. (the pie should be in the oven for a total of about 55-65 minutes)
- You will know the pie is done when the edges of the crust are brown and the crumble is turning a light golden brown in the center. If you want your crust and crumble to brown a little more, remove the foil shield and bake another 5-10 minutes.
- Let the pie cool on a wire rack for about 4 hours. I know, this is killer. But if you cut into it now, the juices will be lava hot and way too liquid-y. Your crumble will get wet and soggy sad. You have to wait for it to cool to room temperature to get the right texture for the filling AND to not ruin the crumble. Pie! A lesson in patience indeed.
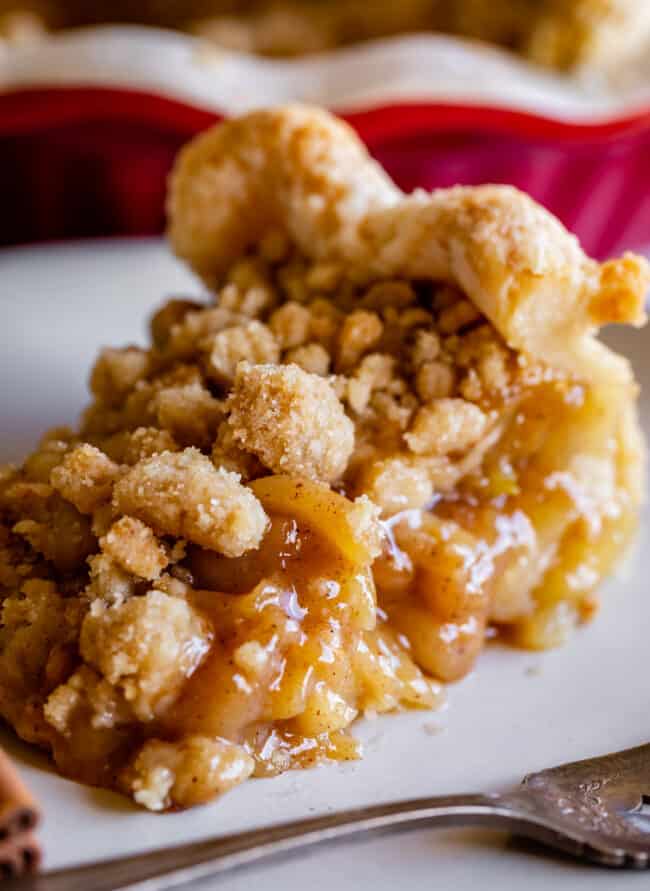
- Once the pie is completely cool, slice and serve! My husband Eric considers it a crime to serve this without vanilla ice cream, and I tend to agree. Treat yoself right. Add in some caramel sauce for a really decadent treat!
- Store the pie on the counter for up to 2 days, covered with plastic wrap or foil. After that transfer it to the fridge.
- See notes for detailed freezing instructions!
Notes
*At this point you can add the apple pie filling (once cooled) to a large ziplock bag and freeze for up to 3 months! Use in pies , cobblers, apple crisp , etc.How to freeze Dutch Apple Pie:Method 1: Make the crust, filling, and topping and freeze each separately in freezer ziplock bags. Thaw in the fridge, then follow the directions for assembly and baking.Method 2: Completely assemble the pie in the pie pan up through adding the first half of the crumble. Wrap the whole pie, pan and all, really well in plastic wrap and then foil (I suggest two layers of each to avoid freezer burn) and the second half of the crumb topping in a small freezer ziplock bag. Store upright in the freezer for 1- 3 months. The longer it’s in the freezer, the more it’s at risk of drying out. When ready to bake, remove pie from freezer and remove foil and plastic wrap. Preheat your oven to 425 degrees with a pizza stone or cookie sheet on the center rack. Follow the baking instructions in the original recipe starting with step 24, but plan on an additional 15-20 minutes of bake time at the end. Watch the second layer of crumb topping the last 10 minutes and cover the entire top of the pie with foil if it’s getting too brown.Method 3: To freeze after baking the pie, allow the baked pie to cool completely, like a full 8 hours. Wrap it really well in plastic wrap and then foil (I suggest two layers of each to avoid freezer burn). When ready to bake, remove pie from freezer and remove foil and plastic wrap. Preheat oven to 350 degrees with a cookie sheet or pizza stone on the center rack. Once the oven is at temperature, place the frozen pie directly onto the cookie sheet/stone. Bake for about 30 minutes or until warmed through. Because the pie is already baked, you’ll need to watch your crust and crumb topping very carefully to make sure they don’t burn. Add a square of foil over the top of the whole pie if it’s browning too much.
Nutrition
serving: 1 slice, calories: 574 kcal, carbohydrates: 101 g, protein: 4 g, fat: 19 g, saturated fat: 10 g, polyunsaturated fat: 1 g, monounsaturated fat: 6 g, trans fat: 1 g, cholesterol: 37 mg, sodium: 434 mg, potassium: 332 mg, fiber: 7 g, sugar: 67 g, vitamin a: 550 iu, vitamin c: 12 mg, calcium: 52 mg, iron: 2 mg