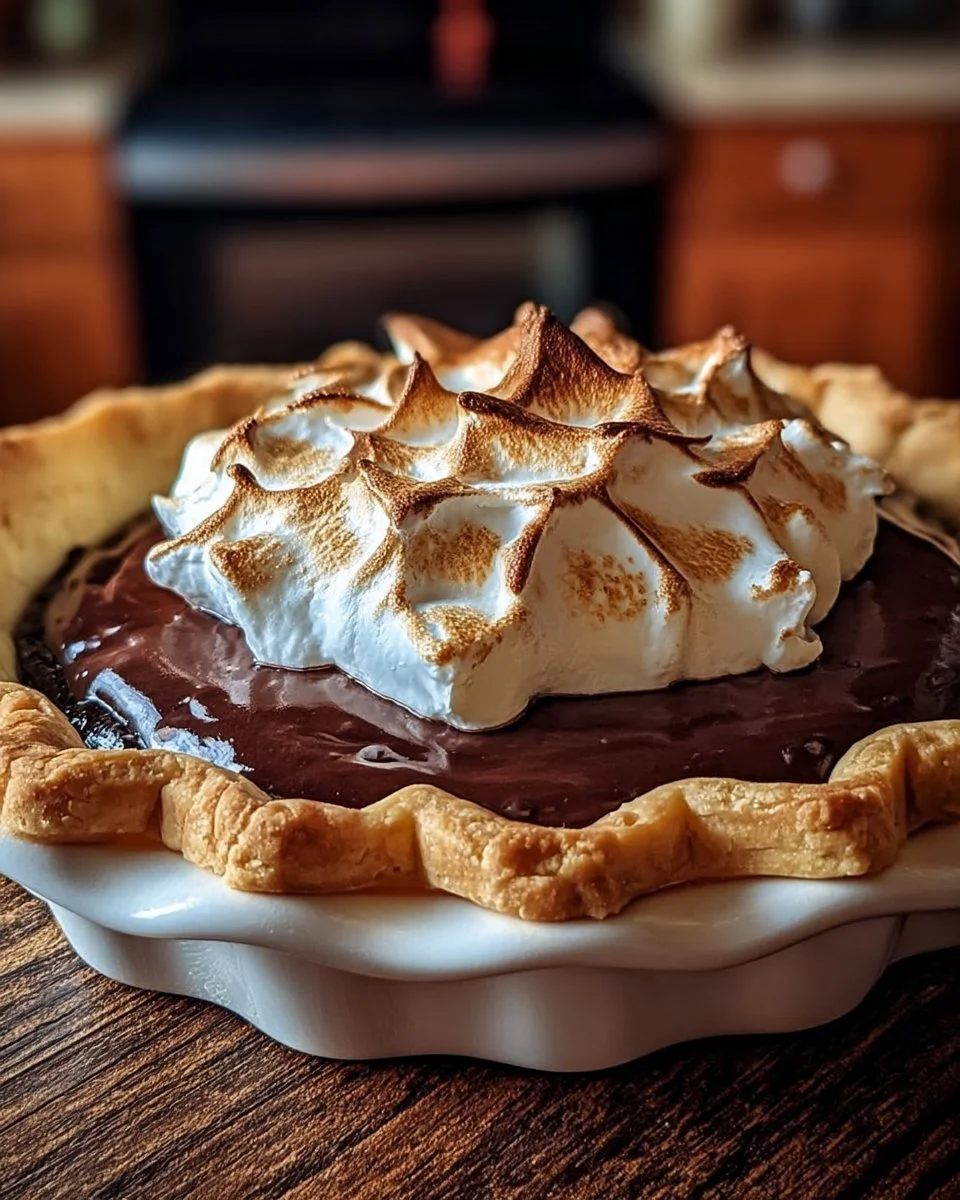
Chocolate Pie Memories: The Heart and Soul of My Kitchen
There’s something almost magical about an old fashioned chocolate pie cooling on the countertop. I can still remember the first time my grandmother handed me a warm slice, a generous swirl of whipped cream perched on top, and how the rich, velvety filling seemed to melt into the flaky crust with every bite.
That moment—sweet, simple, a little bit messy—always comes rushing back every time I bake this classic chocolate pie. You know those recipes that aren’t just desserts, but memory-makers? This is mine, and if you’re searching for a soul-warming pièce de résistance, you’re in just the right place.
Why You’ll Adore This Old Fashioned Chocolate Pie
Now, you may be asking yourself: why make an old fashioned chocolate pie from scratch when there are so many easy dessert recipes out there? Let me give you a few delicious reasons:
- Nostalgic Flavors: Every bite is pure comfort—think deep chocolate flavor with just the right amount of sweetness and that irresistible homemade touch that no store-bought dessert can match.
- Simple, Pantry-Friendly Ingredients: No fancy chocolate or hard-to-find ingredients here. You probably have everything you need right in your kitchen, making this a truly classic dessert.
- Crowd-Pleaser: Whether it’s Sunday supper, a holiday gathering, or just a rainy Tuesday, this homemade chocolate pie draws everyone to the table (and usually back for seconds).
- Easy to Make, Impressive to Serve: If you can whisk and stir, you can pull off this recipe—and watch friends and family marvel at your baking prowess.
Ingredients You’ll Need for Old Fashioned Chocolate Pie
Let’s talk ingredients—it’s what makes or breaks any homemade pie. Here’s what you’ll need for this timeless chocolate dessert:
- 1 cup sugar: I find that white granulated sugar gives the perfect sweetness without overpowering the chocolate.
- 2 tablespoons cornstarch: This is your thickening hero. Trust me, don’t skip it—it gives the filling that silky, pudding-like texture.
- 1/4 teaspoon salt: Just a pinch balances out the sweetness and brings out the cocoa notes.
- 2 cups milk: Whole milk is best for that creamy richness, but I’ve used 2% in a pinch and it still comes out great.
- 2 ounces unsweetened chocolate, chopped: Go for high-quality baking chocolate if you have it—this is where all the deep, chocolatey flavor comes from!
- 3 egg yolks, beaten: These add body and a luscious mouthfeel to your filling.
- 2 tablespoons butter: Don’t skimp—real butter adds depth and a little luxury.
- 1 teaspoon vanilla extract: For that “just-like-Grandma’s” aroma and extra sweetness.
- 1 pre-baked pie crust: Make your own if you’re feeling ambitious, or use a store-bought crust if you want to keep things simple.
- Whipped cream for topping: Light, fluffy, and completely optional—though my family would argue it’s non-negotiable!
Step-by-Step Guide: Making the Perfect Old Fashioned Chocolate Pie
If you’re anything like me, the best recipes are the ones you can almost make from memory. But just in case, here’s how to whip up this old fashioned chocolate pie—messy apron and happy heart included.
- Mix the Dry Ingredients: In a medium saucepan, whisk together the sugar, cornstarch, and salt. Pause and admire that “science experiment” moment before you add the wet ingredients.
- Add and Heat the Milk: Gradually whisk in the milk, making sure there are no lumps. Turn the heat to medium and bring it to a gentle boil, stirring constantly so nothing scorches at the bottom.
- Melt in the Chocolate: Toss in your chopped unsweetened chocolate, and stir until completely melted and the mixture is smooth and glossy (this is where your kitchen starts to smell amazing).
- Temper the Egg Yolks: In a small bowl, whisk the egg yolks. Slowly add a little of the hot chocolate mixture to the eggs while whisking—this keeps them from scrambling. Then, pour everything back into the saucepan, stirring as you go.
- Finish the Filling: Cook for another 2–3 minutes, stirring all the while, until the filling thickens and looks pudding-like.
- Add Butter and Vanilla: Remove from heat. Stir in the butter and vanilla extract until melted and combined.
- Assemble: Pour the dreamy chocolate filling into your pre-baked crust. Use a spatula to spread it evenly (and, if you’re me, sneak a taste).
- Cool and Chill: Let the pie cool at room temperature, then cover and refrigerate for at least 4 hours—if you can stand the wait!
- Serve: Top with silky whipped cream, slice, and enjoy!
My Secret Tips and Tricks for Old Fashioned Chocolate Pie Success
After years (and more than a few chocolate pie disasters), I’ve learned a thing or two. Here are my favorite chocolate pie tips—because everyone deserves a pie that sets just right!
- Be Patient with the Thickening: If your filling still looks runny after 2–3 minutes, keep cooking and stirring until it “holds its shape” when you run a spoon through it.
- Use High-Quality Chocolate: The better your chocolate, the better the flavor. I love using a good baking bar—skip the chocolate chips if you can.
- Don’t Rush the Cooling: Resist the urge to cut into your chocolate pie too soon. Refrigerating helps the filling set for those picture-perfect slices (and trust me, the anticipation is worth it).
- Whipped Cream for the Win: If you can, make your own whipped cream in just minutes—it’s lighter, fluffier, and takes this homemade pie over the top.
Creative Variations and Ingredient Swaps
Want to put your own spin on this classic dessert? Here are a few fun and delicious ways to adapt your chocolate pie:
- Make it Dairy-Free: Use almond, oat, or coconut milk instead of cow’s milk, and dairy-free butter. The result is still rich and completely crave-worthy.
- Crust Creativity: Graham cracker crust, chocolate cookie crust, or even a gluten-free pie shell work beautifully—so use whatever you love.
- Add a Dash of Spice: Mix in a hint of cinnamon or a pinch of chili powder with your chocolate for a Mexican hot chocolate vibe.
- Nutty Crunch: Sprinkle toasted pecans or hazelnuts over the filling before you chill the pie for an extra layer of flavor and texture.
How to Serve and Store Your Old Fashioned Chocolate Pie
When it’s finally time to dig in, here’s how I love to serve and save any leftovers (although leftovers are rare!):
- Serving: For those perfectly clean slices, use a hot knife and gently wipe between cuts. Top with cold whipped cream or a dusting of cocoa powder for that bakery-worthy look.
- Storing: Keep leftovers covered with plastic wrap or in an airtight container in the fridge (homemade pies like this usually last 2–3 days, though they rarely stick around that long).
- Make-Ahead Magic: This easy dessert is the ultimate make-ahead treat, perfect for prepping the night before your big family dinner or a holiday celebration.
FAQs: Your Top Questions About Old Fashioned Chocolate Pie Answered
Q: Can I use semi-sweet chocolate instead of unsweetened?
A: Absolutely! Just reduce the sugar a smidge to compensate for the extra sweetness, and you’ll still get a dreamy chocolate pie.
Q: Why does my chocolate pie filling sometimes turn lumpy?
A: Usually, it’s from adding the eggs too quickly or not whisking enough while tempering. Take your time, and you’ll always get that smooth, silky filling.
Q: Can I freeze homemade chocolate pie?
A: I recommend enjoying it fresh or from the fridge, as freezing can affect the texture and make the filling weep. If you do, wrap it tightly and thaw completely in the refrigerator before serving.
Q: Is this classic chocolate pie gluten-free?
A: The filling itself is naturally gluten-free! Just use a gluten-free pie crust, and you’ve got a gluten-free dessert everyone can love.
Q: How can I make this pie even prettier?
A: Try a sprinkle of chocolate shavings, a dusting of powdered sugar, or some fresh berries on top. It’s almost too beautiful to eat—almost.
So, whether you’re baking up a storm for the holidays, surprising a friend, or just indulging in a little solo chocolate therapy, this old fashioned chocolate pie is truly the best kind of comfort food. It’s a recipe from my heart to yours—and I can’t wait to hear how it becomes a tradition in your home, too. Happy baking!