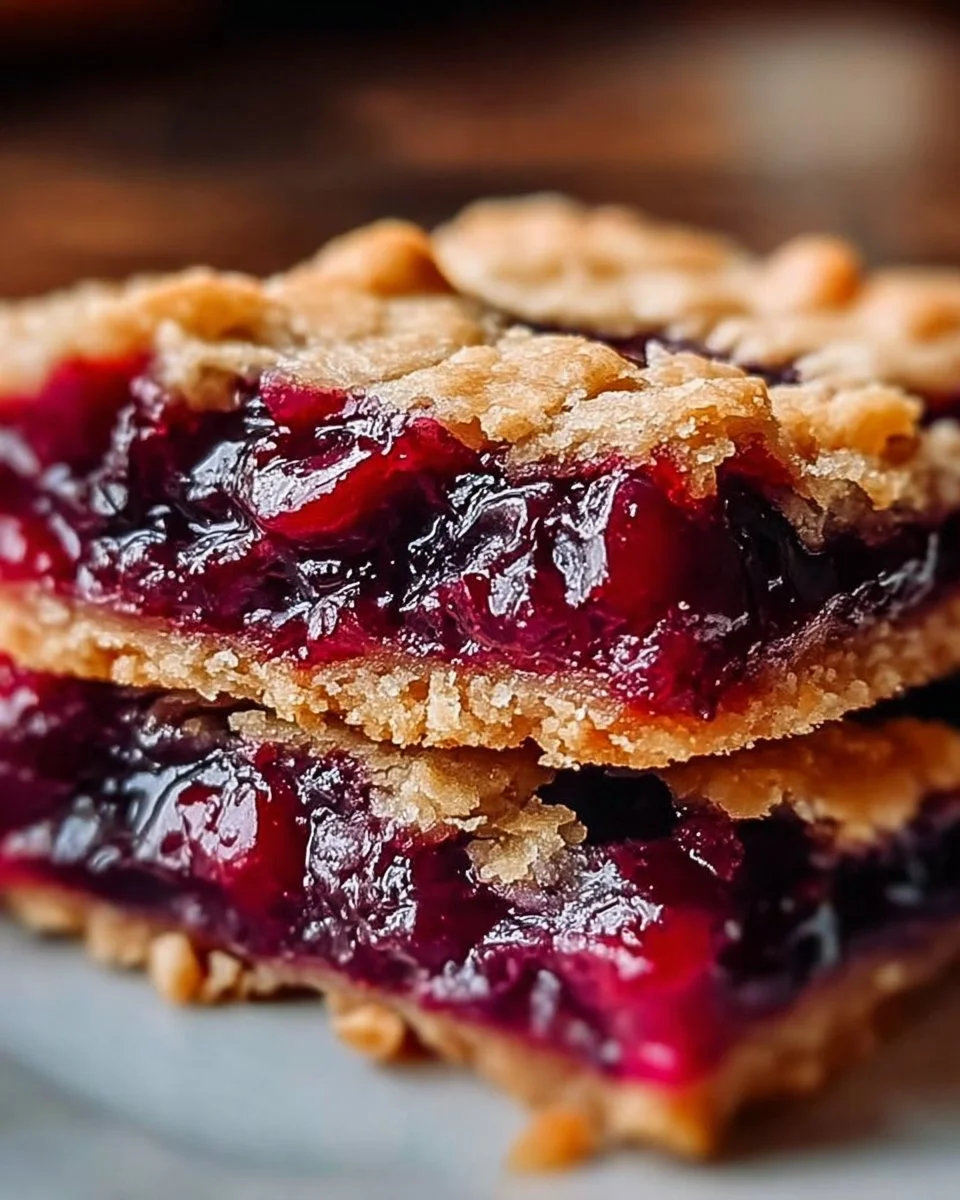
A Sweet Memory Baked Into Every Bite: Cherry Pie Bars
There’s something so undeniably joyful about the scent of cherry pie wafting through my kitchen—it immediately transports me back to summer family picnics, where laughter floated beneath sun-dappled trees and dessert always meant someone had made a classic cherry pie. But as much as I adore that nostalgic treat, these Cherry Pie Bars deliver all the goodness of homemade cherry pie in a simpler, fuss-free format. The buttery, cake-like crust paired with that bright, jammy cherry pie filling? Pure comfort, no rolling pin required!
Why You’ll Adore These Cherry Pie Bars
Honestly, there are a million reasons to fall head over heels for this easy dessert, but here are my favorites:
- Effortless, Yet Impressive: Classic cherry pie can feel daunting, but these cherry pie bars come together in a baking dish—no lattice crust or intricate pie crust shaping needed.
- Perfect for Sharing: Sliced into tidy bars, they’re ideal for potlucks, holiday trays, or after-school snacks (trust me, they’ll disappear fast).
- Soft, Sweet & Buttery: The combination of a tender cookie base and syrupy cherry center is a match made in dessert heaven.
- Year-Round Enjoyment: With canned cherry pie filling at the ready, you don’t have to wait for cherry season. You can enjoy their summery flavor anytime!
Ingredients You’ll Need for Cherry Pie Bars
Let’s set you up for cherry pie bar success! Here’s what you’ll need, plus a few insider tips:
- 1 cup unsalted butter, softened: Let it come to room temp for easy creaming. Real butter makes for the richest flavor (I highly recommend it for classic dessert recipes).
- 1 3/4 cups granulated sugar: Just the right amount for sweetness that highlights (but doesn’t overpower) the cherries.
- 1 teaspoon vanilla extract: Go for pure vanilla if you can—it makes a world of difference.
- 4 large eggs: Room temperature eggs blend more smoothly into the batter.
- 2 cups all-purpose flour: Be sure to measure it correctly (spoon and level!) for that perfect light texture.
- 1 teaspoon baking powder: Gives the bars their gentle lift.
- 1/4 teaspoon salt: Balances the sweetness and enhances flavor (don’t skip it!).
- 1 can (21 oz) cherry pie filling: Use your favorite brand, or even a homemade cherry pie filling if you’re feeling ambitious.
Step-by-Step Guide: Making the Perfect Cherry Pie Bars
Ready to bake some magic? Let’s walk through it together:
- Preheat your oven to 350°F (175°C). Grease a 9×13 inch baking dish (I like to line it with parchment paper for easy lifting later—such a time saver).
- Cream together the softened butter and sugar in a large bowl until smooth and fluffy. You want it light and airy—this sets the stage for a tender bar.
- Add eggs one at a time, beating just until each is incorporated, then stir in the vanilla. Each egg adds richness (and a little patience here makes a big difference).
- In a separate bowl, whisk together the flour, baking powder, and salt. Gradually add the dry mixture to the wet ingredients until just combined—don’t overmix to keep the bars soft.
- Spread half the batter into your prepared pan. It’ll be a bit sticky—I use a spatula sprayed with a touch of oil.
- Spoon all the cherry pie filling evenly over the bottom layer. It may look like a lot, but trust the process (the filling sets up beautifully as it bakes).
- Drop the remaining batter in spoonfuls over the cherries. Gaps are okay—the cherry layer peeks through for a pretty, “cobbled” effect.
- Bake for 30-35 minutes or until the top is golden and the edges start to pull away from the pan.
- Cool completely before cutting into bars—this is the hardest part, but they hold their shape best if you wait!
My Secret Tips and Tricks for Cherry Pie Bar Success
Over the years, making these cherry pie bars has taught me a few little tricks. Here’s what’ll take yours from good to absolute best:
- Use room temperature ingredients. Cold eggs or butter can make the batter lumpy and tricky to spread.
- Don’t overbake! As soon as the top is golden, pull them out. They’ll finish setting as they cool, keeping the bars moist.
- Lining the pan with parchment makes clean-up (and bar removal) extra easy.
- Adding a touch of almond extract (just 1/4 teaspoon) can accentuate the cherry flavor and give that classic, bakery-style taste (almond pairs perfectly with cherry desserts).
Creative Variations and Ingredient Swaps
The beauty of this cherry pie bars recipe is how flexible it is:
- Swap the filling: Try blueberry, apple, or even raspberry pie filling for a fun twist—all work beautifully in this easy dessert recipe.
- Gluten-free? Substitute a cup-for-cup gluten-free flour blend. I’ve had great results with King Arthur’s.
- Dairy-free option: Use a good-quality vegan butter (like Miyoko’s) and plant-based egg replacer for a vegan cherry bar (the texture stays lovely).
- Add a drizzle: A simple glaze—just mix powdered sugar with a splash of milk and almond extract—takes these bars over the top.
How to Serve and Store Your Cherry Pie Bars
Serving:
- These homemade cherry bars are delicious as-is, but for a real treat, serve slightly warm with a scoop of vanilla ice cream (classic comfort food!).
- For brunch or breakfast, cut them smaller and enjoy alongside a cup of coffee or tea.
Storing leftovers:
- Keep leftover bars in an airtight container at room temperature for 2-3 days.
- Want to keep them longer? Store in the fridge for up to 5 days (they’re amazing chilled!).
- Freeze for up to 3 months—just wrap bars individually and thaw as needed.
FAQs: Your Top Questions About Cherry Pie Bars Answered
Can I use homemade cherry pie filling?
Absolutely! If you have a favorite homemade cherry pie filling recipe, it’ll be stellar here (and it’s a great way to use up summer cherries).
Can I double the recipe for a crowd?
Yes—just use a larger baking sheet (like a jelly roll pan) or bake in two 9×13 pans. This is my go-to recipe for parties and bake sales.
Why did my bars turn out dry?
Most often, overbaking is the culprit. Ovens vary, so check at the 30-minute mark and pull them as soon as they’re golden.
Can I make cherry pie bars ahead of time?
Definitely! They’re even better the next day as flavors meld, making them the perfect make-ahead dessert for gatherings.
Are cherry pie bars freezer-friendly?
Yes—just cool, cut, and freeze. They thaw beautifully for an easy sweet treat (great for those cherry bar cravings at midnight).
If you’re looking for an unfussy, crowd-pleasing dessert that delivers all the nostalgia of cherry pie—without any pie crust drama—these Cherry Pie Bars are destined to be your new favorite. I can’t wait to hear how they turn out in your kitchen! Leave a comment below with your memories or favorite twists. Happy baking! 🍒